There’s something undeniably satisfying about the perfect crunch of Japanese Katsu Bowls with Tonkatsu Sauce. This beloved dish combines golden-fried, panko-crusted meat with a sweet-tangy sauce that’s drizzled over fluffy rice and crisp vegetables. While katsu has its roots in Western cuisine (it’s inspired by European schnitzel), it has become quintessentially Japanese through its careful technique, balanced flavors, and thoughtful presentation.
Unlike many fried foods that leave you feeling heavy, Japanese Katsu Bowls with Tonkatsu Sauce offer a surprisingly well-rounded meal when paired with fresh cabbage and steamed rice. The contrasting textures—crispy exterior, juicy meat, fluffy rice, and crunchy vegetables—create a multisensory experience that’s both comforting and refined.
Whether you’re new to Japanese cuisine or a seasoned home cook looking to perfect your katsu technique, this comprehensive guide will walk you through creating restaurant-quality Japanese Katsu Bowls with Tonkatsu Sauce right in your own kitchen. Let’s dive into this irresistible dish that’s guaranteed to become a family favorite!
Why You’ll Love These Japanese Katsu Bowls with Tonkatsu Sauce
This isn’t just another dinner recipe—Japanese Katsu Bowls with Tonkatsu Sauce deliver a culinary experience that hits all the right notes. The contrast between the hot, crispy katsu and the cool, fresh cabbage creates a perfect temperature balance, while the sweet-savory tonkatsu sauce ties everything together with its complex umami flavor.
The versatility of these Japanese Katsu Bowls with Tonkatsu Sauce is another compelling reason to add them to your rotation. While the traditional version uses pork (tonkatsu), chicken (chicken katsu) works beautifully as well. You can even make vegetarian versions using firm tofu or thick slices of eggplant. The basic technique remains the same, allowing you to adapt based on preferences or what’s available in your kitchen.
Perhaps most appealingly, these bowls bring restaurant-quality Japanese food into your home kitchen with ingredients you can find at most well-stocked supermarkets. The homemade tonkatsu sauce tastes far superior to bottled versions, yet comes together in minutes with common pantry staples. And while the dish looks impressive, the actual cooking process is straightforward—perfect for both weeknight dinners and special occasions.
Finally, for those new to Japanese cooking, these katsu bowls serve as a wonderful entry point. The flavors are approachable while still being authentic, and mastering this recipe builds culinary skills that translate to many other dishes in the Japanese repertoire.
Essential Ingredients for Perfect Japanese Katsu Bowls
The magic of Japanese Katsu Bowls with Tonkatsu Sauce lies in the quality and preparation of a few key ingredients:
Protein: Traditionally, katsu is made with boneless pork chops that are about 1/2-inch thick. Look for well-marbled cuts like center-cut loin chops for the juiciest result. If using chicken, boneless, skinless chicken breasts pounded to an even thickness work perfectly. The uniform thickness ensures even cooking throughout.
Panko breadcrumbs are non-negotiable for authentic Japanese Katsu Bowls with Tonkatsu Sauce. Unlike fine western breadcrumbs, panko consists of larger, airy flakes that create an exceptionally crispy coating without absorbing as much oil. They’re now widely available in most grocery stores, but if you can find authentic Japanese panko, the texture will be even better.
The tonkatsu sauce balances sweet, tangy, and savory elements. While you could buy pre-made tonkatsu sauce, the homemade version has a fresher flavor and allows you to adjust to your taste. Ketchup provides the body and sweetness, while Worcestershire and soy sauce add depth and umami. Mirin (sweet rice wine) is traditional, but the adaptation with rice vinegar and a touch of sugar works well in a pinch.
Japanese short-grain rice is crucial for authentic bowls. Its sticky texture and subtle sweetness complement the crispy katsu perfectly. This type of rice, sometimes labeled as “sushi rice,” has plumper grains that stick together when properly cooked, making it ideal for chopstick handling and soaking up the delicious tonkatsu sauce.
Cabbage might seem like a simple side, but it’s actually an integral part of Japanese Katsu Bowls with Tonkatsu Sauce. Traditionally, it’s sliced paper-thin and serves as a refreshing, crunchy counterpoint to the rich fried katsu. The neutral flavor and crisp texture cleanse the palate between bites of the rich, fried meat.
Sesame seeds add a subtle nutty flavor and visual appeal. They’re more than just garnish—they enhance the overall flavor profile of Japanese Katsu Bowls with Tonkatsu Sauce and add another layer of texture to the dish.

The Art of Perfect Panko Breading
The signature crunch of Japanese Katsu Bowls with Tonkatsu Sauce comes from properly executed panko breading. Follow these steps for the perfect golden crust every time:
Start with properly prepared meat. For pork, trim any excess fat around the edges (leaving some for flavor) and make small cuts around the perimeter to prevent curling during frying. For chicken, pound to an even thickness of about 1/2 inch. Thoroughly pat your protein dry with paper towels—moisture is the enemy of crispiness—and season generously with salt and pepper.
The three-step breading process is essential. First, dust your seasoned meat with flour, shaking off any excess. This creates a dry surface for the egg to adhere to. Next, dip in beaten egg, allowing excess to drip off. Finally, press firmly into the panko breadcrumbs, making sure to cover every surface evenly. Use your fingertips to gently press the panko into the meat to ensure it sticks well.
For extra-crispy Japanese Katsu Bowls with Tonkatsu Sauce, let the breaded cutlets rest on a wire rack for 5-10 minutes before frying. This allows the coating to set and adhere better to the meat. If you’re preparing multiple cutlets, you can bread them all first, then fry them in batches.
Resist the urge to press or flatten the panko when breading. The airy, irregular texture of panko is what creates that spectacular crunch. Pressing too firmly will compact the breadcrumbs and result in a denser coating. Instead, gently press just enough to ensure adhesion while maintaining the breadcrumbs’ structure.
Frying Techniques for Golden, Crispy Katsu
Achieving the perfect golden-brown crust on Japanese Katsu Bowls with Tonkatsu Sauce requires attention to oil temperature and frying technique. Here’s how to nail it:
Choose a neutral oil with a high smoke point like vegetable, canola, or peanut oil. The oil should be about 1/2 inch deep in a heavy-bottomed skillet or Dutch oven. A cast-iron skillet works particularly well for maintaining consistent temperature.
Oil temperature is critical—too cool and the katsu absorbs excess oil and becomes greasy; too hot and the exterior burns before the inside cooks through. The ideal temperature is around 350°F (175°C). If you don’t have a thermometer, test by dropping a few panko crumbs into the oil—they should sizzle immediately and float to the surface, but not darken too quickly.
When adding your breaded cutlets to the oil, gently lay them away from you to prevent hot oil splashes. Leave plenty of space between pieces—overcrowding the pan lowers the oil temperature and creates steaminess rather than crispiness. For most home pans, cook just one or two pieces at a time.
The frying time for Japanese Katsu Bowls with Tonkatsu Sauce is typically 3-4 minutes per side, but this varies based on thickness. Look for a deep golden-brown color as your visual cue. If using pork, you want an internal temperature of 145°F (63°C) with a slight blush of pink in the center. For chicken, aim for 165°F (74°C) throughout.
After frying, transfer the katsu to a wire rack set over a baking sheet rather than paper towels. This allows air to circulate around the entire cutlet, keeping it crispy on all sides as it cools slightly before slicing.
Crafting the Perfect Tonkatsu Sauce
The tonkatsu sauce is what elevates Japanese Katsu Bowls with Tonkatsu Sauce from simply fried meat to a cohesive, flavorful dish. This thick, brown sauce balances sweet, tangy, and savory elements perfectly.
Commercial tonkatsu sauce (sometimes labeled “bulldog sauce”) has a distinctive flavor, but the homemade version offers fresher taste and customization options. The base of ketchup provides thickness and sweetness, while Worcestershire sauce adds complexity with its fermented umami notes. Soy sauce brings saltiness and depth, and mirin contributes sweetness with a subtle rice wine flavor.
Balancing these elements is key. After combining the ingredients, taste and adjust. If it’s too sweet, add a splash more Worcestershire or soy sauce. If it’s too tangy, a touch more honey can round it out. The finished sauce should be glossy, pourable, and able to coat the back of a spoon—thick enough to cling to the katsu but not so thick it doesn’t drizzle nicely.
For an extra layer of flavor in your Japanese Katsu Bowls with Tonkatsu Sauce, try adding a teaspoon of grated fresh ginger or garlic to the sauce. While not strictly traditional, these additions complement the other flavors beautifully. The sauce can be made several days in advance and stored in the refrigerator, where it actually improves as the flavors meld.
When serving, remember that a little tonkatsu sauce goes a long way. Drizzle it over the sliced katsu rather than drowning it, preserving the crispiness of the coating. You can always serve extra sauce on the side for those who prefer more.

Perfecting Japanese Short-Grain Rice
Properly cooked rice is the foundation of authentic Japanese Katsu Bowls with Tonkatsu Sauce. Japanese short-grain rice has a unique sticky texture that’s different from long-grain varieties used in other cuisines.
Begin by rinsing the rice thoroughly under cold water, swirling with your hands until the water runs fairly clear. This removes excess starch that can make the rice gummy. After rinsing, some recipes call for soaking the rice for 30 minutes, which helps it cook more evenly, though this step can be skipped if you’re short on time.
The ideal rice-to-water ratio is 1:1.1 for Japanese short-grain rice—slightly less water than you might use for other varieties. If using a rice cooker, simply follow the manufacturer’s instructions for short-grain or sushi rice. For stovetop cooking, bring the rice and water to a boil, reduce to the lowest possible simmer, cover tightly, and cook for 15 minutes without peeking. Then remove from heat and let stand, still covered, for 10 more minutes.
The finished rice for Japanese Katsu Bowls with Tonkatsu Sauce should be tender but still have a slight resistance when bitten, with grains that stick together but remain distinct. Fluff gently with a rice paddle or fork before serving, being careful not to mash the grains.
For an extra touch of authenticity, season your cooked rice with a mixture of rice vinegar, sugar, and salt (about 1 tablespoon vinegar, 1/2 teaspoon sugar, and a pinch of salt per cup of uncooked rice). This subtle seasoning complements the tonkatsu sauce beautifully.
Assembling Your Japanese Katsu Bowls with Tonkatsu Sauce
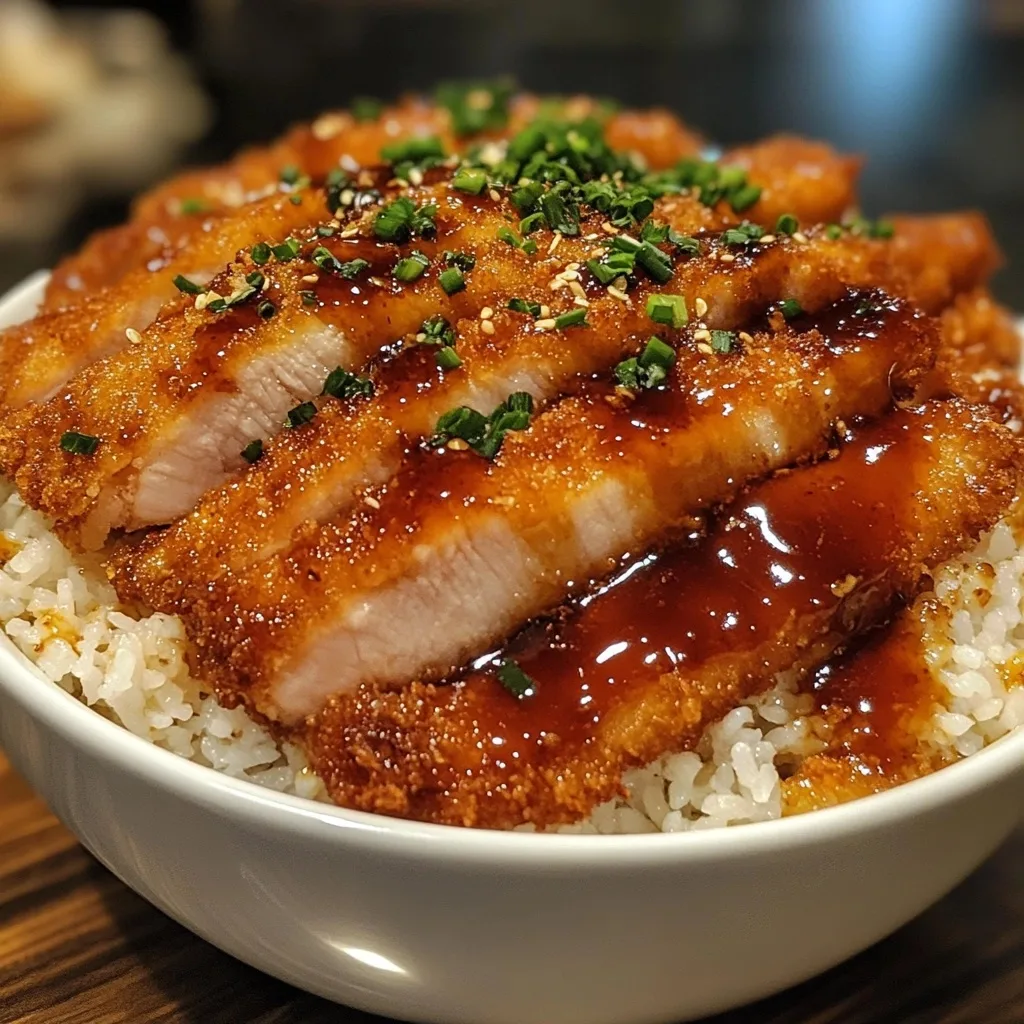
The presentation of Japanese Katsu Bowls with Tonkatsu Sauce is almost as important as the preparation of the individual components. A thoughtfully assembled bowl is visually appealing and ensures a perfect blend of flavors and textures in each bite.
Start with warm rice as your base, mounded in the center of each bowl. Slice your katsu into 3/4-inch strips perpendicular to the grain of the meat. This makes the katsu easier to eat and shows off the juicy interior contrasted with the crispy coating. Arrange these slices attractively over one side of the rice.
Next, place a generous portion of shredded cabbage alongside the katsu. Traditionally, cabbage for Japanese Katsu Bowls with Tonkatsu Sauce is sliced extremely thin—if you have a mandoline, this is the perfect time to use it. The fresh crispness of the cabbage balances the richness of the fried katsu.
Drizzle your homemade tonkatsu sauce over the sliced katsu, allowing some to run onto the rice. Be judicious—you want to enhance, not overwhelm, the flavors. Sprinkle sliced scallions over the entire bowl for a pop of color and fresh flavor.
Finish with a sprinkle of toasted sesame seeds and, if using, a few pieces of pickled ginger on the side. The sesame adds nuttiness while the ginger provides palate-cleansing brightness between bites of the rich Japanese Katsu Bowls with Tonkatsu Sauce.
For family-style serving, you can present the components separately: a platter of sliced katsu, a bowl of sauce for drizzling, a mound of cabbage, and a large bowl of rice. This allows everyone to assemble their bowl according to their preferences.
Variations on Classic Japanese Katsu Bowls
While the traditional pork version is delicious, there are many ways to customize Japanese Katsu Bowls with Tonkatsu Sauce to suit different preferences or dietary needs:
Chicken Katsu Bowls: Simply substitute pounded chicken breasts or thighs for the pork. Chicken katsu has a milder flavor that particularly appeals to those who don’t eat pork or prefer lighter meats. The cooking process remains the same, though chicken may need slightly less time in the oil.
Vegetarian Katsu: Firm tofu, sliced 1/2-inch thick and pressed to remove excess moisture, makes an excellent plant-based alternative. Alternatively, thick slices of eggplant create a meaty texture when breaded and fried. Both absorb the tonkatsu sauce beautifully.
Curry Katsu: For a twist on Japanese Katsu Bowls with Tonkatsu Sauce, serve your katsu with Japanese curry sauce instead of or alongside the tonkatsu sauce. This variation, known as “katsu curry,” is extremely popular in Japan and adds another dimension of flavor to the dish.
Katsudon: This variation involves simmering sliced katsu with onions, egg, and a sweet-savory sauce, then serving it over rice. It transforms the crispy katsu into a tender, flavor-packed topping that’s especially comforting in cold weather.
Spicy Katsu: Add a teaspoon of sriracha or a pinch of cayenne to your tonkatsu sauce for a spicy kick. Alternatively, serve Japanese Katsu Bowls with Tonkatsu Sauce with a side of wasabi for those who enjoy heat.
Katsu Sandwich (Sando): Not a bowl, but worth mentioning—the katsu sandwich has become an iconic Japanese food in its own right. Place katsu between slices of soft white bread with tonkatsu sauce and thinly sliced cabbage for a fantastic lunch option.

Make-Ahead and Storage Tips
Japanese Katsu Bowls with Tonkatsu Sauce are best enjoyed fresh for maximum crispiness, but with some planning, components can be prepared ahead:
The tonkatsu sauce can be made up to a week in advance and stored in an airtight container in the refrigerator. In fact, the flavors meld and improve over time, making this an ideal make-ahead component.
For the protein, you can season and bread the meat up to 24 hours before cooking. Arrange the breaded cutlets on a baking sheet lined with parchment paper, cover loosely with plastic wrap, and refrigerate. Allow them to come to room temperature for 20 minutes before frying for the most even cooking.
Rice can be cooked a day ahead and reheated. For best results, refrigerate cooked rice in an airtight container, then sprinkle with a few drops of water before microwaving until hot and fluffy. Alternatively, a rice cooker’s “keep warm” function can maintain freshly cooked rice in perfect condition for hours.
Prepared cabbage begins to wilt quickly once sliced, so it’s best cut just before serving. However, you can wash and dry the whole cabbage head in advance, making it ready for last-minute slicing.
If you do have leftover fried katsu from your Japanese Katsu Bowls with Tonkatsu Sauce, refrigerate it in an airtight container for up to 2 days. To reheat, place on a wire rack over a baking sheet in a 350°F (175°C) oven for 10-15 minutes. While it won’t be quite as crispy as fresh, this method helps restore some crunch to the coating.
Frequently Asked Questions About Japanese Katsu Bowls with Tonkatsu Sauce
Can I bake the katsu instead of frying? Yes, though the texture won’t be identical to traditional Japanese Katsu Bowls with Tonkatsu Sauce. For a baked version, preheat your oven to 400°F (200°C) and place breaded cutlets on a wire rack over a baking sheet. Spray or drizzle with oil and bake for about 20 minutes, flipping halfway through, until golden brown and cooked through.
What can I substitute for panko breadcrumbs? While regular breadcrumbs will work in a pinch, they won’t provide the same airy crunch. To approximate panko’s texture, tear day-old white bread into pieces, dry in a low oven until crisp but not browned, then pulse briefly in a food processor until you have coarse crumbs.
Is there a gluten-free option for Japanese Katsu Bowls with Tonkatsu Sauce? Absolutely! Use gluten-free panko (now available in many stores) or crushed rice cereal as breading. Substitute gluten-free flour in the dredging step, and ensure your Worcestershire and soy sauces are gluten-free varieties (tamari is a good gluten-free soy sauce option).
What sides pair well with these bowls? Traditional accompaniments include miso soup, Japanese pickles (tsukemono), or a simple cucumber salad dressed with rice vinegar and sesame oil. For a fuller meal, start with edamame or a small portion of cold tofu with soy sauce (hiyayakko).
Can I make the tonkatsu sauce less sweet? Certainly! Reduce the ketchup and honey, and increase the Worcestershire and soy sauce for a tangier, more savory profile. The beauty of homemade sauce for Japanese Katsu Bowls with Tonkatsu Sauce is that you can adjust to your personal preference.
More Related Recipes You Might Enjoy
If you love these Japanese Katsu Bowls with Tonkatsu Sauce, here are some other delicious recipes with similar flavor profiles or techniques that you might want to try:
Fiery Chicken Ramen with Creamy Garlic Sauce – Another Japanese-inspired dish that combines crispy chicken with noodles in a spicy, creamy broth. The protein preparation is similar to katsu, making this a natural next step in your Asian cooking journey.
Crispy Garlic Butter Skillet Chicken – If you enjoy the crispy exterior of katsu, you’ll love this skillet chicken with its garlicky butter sauce. It uses a different technique to achieve crispiness but delivers equally satisfying results.
Lemon Herb Chicken with Asparagus – For a lighter alternative that still features perfectly cooked chicken, this bright, herb-forward dish makes an excellent weeknight option when you want something less indulgent than fried katsu.
Why Japanese Katsu Bowls with Tonkatsu Sauce Work Every Time
The enduring popularity of Japanese Katsu Bowls with Tonkatsu Sauce comes down to the perfect balance of flavors, textures, and techniques. The crispy exterior of the katsu provides satisfying crunch, while the meat inside remains juicy and tender. The sweet-tangy tonkatsu sauce cuts through the richness of the fried elements, and the fresh cabbage adds brightness and textural contrast.
What makes this dish particularly special is how each component complements the others. The mild, sticky rice absorbs the flavorful sauce, the cabbage refreshes the palate between bites of rich katsu, and the sauce binds everything together with its complex umami profile.
From a culinary perspective, Japanese Katsu Bowls with Tonkatsu Sauce also showcase important techniques that form the foundation of many other dishes—proper breading, temperature control during frying, and sauce balance. Mastering these skills not only ensures perfect katsu but improves your overall cooking repertoire.
Finally, these bowls exemplify the Japanese concept of “washoku”—harmony in food—by providing a complete, balanced meal in a single dish. The protein, grain, and vegetable components create nutritional balance, while the various flavors and textures create sensory harmony that makes every bite of Japanese Katsu Bowls with Tonkatsu Sauce purely satisfying.
Print
Japanese Katsu Bowls with Tonkatsu Sauce | Crispy Comfort Food
- Total Time: 35 minutes
- Yield: 4 servings 1x
Description
These Japanese Katsu Bowls with Tonkatsu Sauce deliver the perfect combination of crispy, golden-fried cutlets and sweet-tangy sauce that will transport your taste buds straight to Japan. Featuring juicy pork (or chicken) encased in a light, crunchy panko coating, drizzled with homemade tonkatsu sauce, and served over fluffy short-grain rice with fresh cabbage – this dish balances textures and flavors for an irresistible meal that’s surprisingly simple to make at home!
Ingredients
For the Katsu:
- 4 boneless pork chops (about 1/2″ thick) or chicken cutlets
- Kosher salt and freshly ground black pepper, to taste
- 1 cup all-purpose flour
- 2 large eggs, beaten
- 1 ½ cups panko breadcrumbs
- Vegetable oil, for frying
For the Tonkatsu Sauce:
- ½ cup ketchup
- 2 tablespoons Worcestershire sauce
- 1 tablespoon soy sauce
- 1 tablespoon mirin (or a splash of rice vinegar + sugar)
- 1 teaspoon Dijon mustard
- 1 teaspoon honey
For the Bowls:
- 4 cups steamed Japanese short-grain rice
- 2 cups shredded cabbage (or coleslaw mix)
- 2 scallions, thinly sliced
- Pickled ginger (optional)
- Toasted sesame seeds, for garnish
Instructions
- Season Your Protein:
- Season pork chops or chicken cutlets with salt and black pepper on both sides.
- Set Up Your Breading Station:
- Arrange three shallow dishes: flour in the first, beaten eggs in the second, and panko breadcrumbs in the third.
- Working with one cutlet at a time, dredge in flour and shake off excess.
- Dip into beaten egg, allowing excess to drip off.
- Press firmly into panko breadcrumbs, ensuring the entire surface is evenly coated with the crispy crumbs.
- Set breaded cutlets on a plate or wire rack.
- Fry to Golden Perfection:
- Heat about ½” of vegetable oil in a heavy skillet or Dutch oven over medium-high heat to approximately 350°F.
- Carefully lay breaded cutlets into the hot oil, avoiding overcrowding (work in batches if necessary).
- Fry for 3-4 minutes per side until deeply golden brown and cooked through.
- Transfer to a paper towel-lined plate to drain excess oil.
- Make the Tonkatsu Sauce:
- While the katsu rests, combine ketchup, Worcestershire sauce, soy sauce, mirin (or rice vinegar and sugar), Dijon mustard, and honey in a small bowl.
- Whisk until completely smooth and glossy. Adjust sweetness or tanginess to taste.
- Assemble Your Bowls:
- Divide warm steamed rice among four bowls.
- Slice each katsu cutlet into strips (about ¾-inch wide) and arrange over the rice.
- Place a portion of shredded cabbage alongside the katsu.
- Drizzle the tonkatsu sauce generously over the sliced katsu.
- Garnish with sliced scallions, toasted sesame seeds, and pickled ginger if using.
- Serve immediately while the katsu is still crispy.
Notes
- For extra-crispy katsu, let the breaded cutlets rest on a wire rack for 5-10 minutes before frying to help the coating adhere better.
- The oil temperature is crucial – too hot and the coating burns before the meat cooks; too cool and the katsu absorbs excess oil. Use a thermometer if possible.
- Traditional Japanese presentation includes very thinly sliced cabbage – use a mandoline if you have one.
- For a lighter version, katsu can be baked instead of fried: place breaded cutlets on a wire rack over a baking sheet, spray with oil, and bake at 400°F for about 20 minutes, turning halfway.
- The tonkatsu sauce can be made up to a week ahead and stored in the refrigerator.
- Prep Time: 10 minutes
- Cook Time: 15 minutes
- Category: Main Dish
- Method: Frying
- Cuisine: Japanese
Nutrition
- Serving Size: 1 bowl
- Calories: 685
- Sugar: 8g
- Sodium: 720mg
- Fat: 28g
- Saturated Fat: 7g
- Unsaturated Fat: 19g
- Trans Fat: 0g
- Carbohydrates: 68g
- Fiber: 3g
- Protein: 38g
- Cholesterol: 140mg